Contents:
- Creating a New Menu from Scratch
- Adding Menu Items
- Editing Menus
Navigating Through Your Menus
Editing Menu Items
Reordering Menus, Sections, and Items - Promoting Your Menu Items
- Hiding Menu Items
- Deleting Menus, Sections, and Items
Creating a New Menu from Scratch
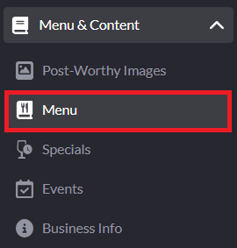
1. Navigate to the "Menu" tab within the "Menu & Content" cluster.
2. On the Menu page, click the "Add Another Food Menu" (or "Add Another Drink Menu") button, found below the existing menus.
-png.png?width=629&height=260&name=annotely_image%20(60)-png.png)
3. Next, enter your menu name and add a description if needed. The description is optional.

4. Click the "Save" button.

5. Once your menu is saved, go ahead and create a menu section. You can also add a section description if you’d like — this part is optional.
-png.png?width=647&height=272&name=annotely_image%20(61)-png.png)
If you’re creating a menu that doesn’t require multiple sections — for example, a small Brunch menu with a few items — you can simply name the menu section "Menu" and click "Save."
6. Once your menu section is ready, you can begin adding the menu items.

Adding Menu Items
1. For adding new menu items, you have the New Menu Item field at the bottom of each menu page.

If you are adding a new menu item to an existing menu that already has multiple menu items listed, just click the orange "Add New Menu Item" button found above the listed menu items.
-png.png?width=670&height=156&name=annotely_image%20(62)-png.png)
2. This will automatically scroll you to the bottom of the page, where you can fill in the item name, description, price and size (if needed).

You can add multiple prices and sizes for a single menu item. After entering the first price and size, click the plus (+) icon ![]() .
.
This will open a new set of fields for price and size  , allowing you to add as many options as needed.
3. Be sure to click the "Save" button to save your new menu item.
-png.png?width=670&height=50&name=annotely_image%20(63)-png.png)
4. Once your menu item has been saved, you can click the camera icon on the left to upload an image if you want to. You can choose an existing image from your SpotHopper gallery or upload a new one.
-png.png?width=666&height=72&name=annotely_image%20(67)-png.png)
📸 You can upload multiple images per menu item. However, only the first image will be displayed on the Menu page on your website. The rest of the images will be used for generating social media posts.
Editing Menus
You can easily manage and update your menus in SpotHopper — from switching between menus to editing specific items, descriptions, and pricing.
Navigating Through Your Menus
When you navigate to the "Menu" ![]() page under "Menu & Content", you’ll land on the Select Menu tab by default.
page under "Menu & Content", you’ll land on the Select Menu tab by default.
From here, you can open the menu you’d like to update by clicking the pencil icon next to it.
-png.png?width=670&height=89&name=annotely_image%20(64)-png.png)
Alternatively, you can simply switch to the Customize Menu tab found at the top of the screen.
This will automatically open the first menu listed, but you can easily browse other menus using the Menu drop-down.
-png.png?width=545&height=301&name=annotely_image%20(65)-png.png)
You can select different menu sections from the Menu Section drop-down.
-png.png?width=545&height=223&name=annotely_image%20(66)-png.png)
Editing Menu Items
Once you find the menu item you wish to edit, simply click the associated pencil icon on the right.
-png.png?width=670&height=71&name=annotely_image%20(69)-png.png)
Here you can edit the menu item's name, description, price and size. When done updating, be sure to save the changes.
If you want to remove the price from your menu item, click the minus (-) icon found next to the price  and save the changes.
If you clck the pencil icon on the image, you will be able to replace the image with a new one.

On the right of every menu item, you will see three red boxes:
Table (dine-in) - When checked, the menu item will show on the menu page on the website.
Bag (pick-up) - Only for SpotHopper's online ordering system. When checked, the item is available for pick up orders.
Truck (delivery) - Only for SpotHopper's online ordering system. When checked, the item is available for delivery orders.
Reordering Menus, Sections, and Items
When you create multiple menus in SpotHopper, the menus, sections, and items are displayed in the order they were created (from first to last). You can easily change this order at any time.
Changing the Order of Entire Menus
1. Navigate to the "Menu" page under "Menu & Content," and click the Customize Menu tab at the top of the screen.
2. Open the Menu drop-down and choose the menu you wish to reorder.
3. Next to the Menu field, click the "Configure/Set Hours" button, as shown in the image below.
-png.png?width=670&height=80&name=annotely_image%20(70)-png.png)
4.  On the left side, you’ll see a Position field.
-
To move the menu closer to the beginning, decrease the position number using the up arrow.
-
To move it further down the list, increase the position number using the down arrow.
Tip: If you want your menu to show first but you do not have the number 1 as position to choose, simply select the smallest position number available.
Changing the order of your menus in SpotHopper updates the order of the menu tabs displayed on the Menu page on your website .
Changing the Order of Menu Sections
1. Navigate to the "Menu" page under "Menu & Content," and click the Customize Menu tab at the top of the screen.
2. Open the Menu Section drop-down, and choose the section you wish to reorder.
3. Next to the Menu Section field, click the "Configure" button, as shown in the image below
-png.png?width=670&height=74&name=annotely_image%20(71)-png.png)
4. On the left side, you’ll see a Position field.
-
To move the section higher, decrease the position number using the up arrow.
-
To move it lower, increase the position number using the down arrow.
Changing the Order of Menu Items
1. Navigate to the "Menu" page under "Menu & Content," and click the pencil icon next to the menu you wish to edit.
2. Find the item you want to reorder, then locate the up and down arrows on the right side.
-png.png?width=670&height=322&name=annotely_image%20(72)-png.png)
3. Click the arrows icon, and a "Move menu item to this location" banner will appear above each menu item.
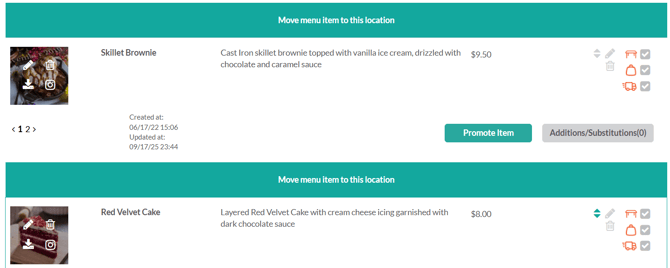
4. Click the banner where you want the selected item to appear — it will be moved instantly.
In the screenshot provided above, the banner above Skillet Brownie was selected, which moved Red Velvet Cake to that position.

Promoting Your Menu Items
Next to each menu item, you will see a green "Promote Item" button.
-png.png?width=670&height=116&name=annotely_image%20(73)-png.png)
Clicking the button will open the Promote Menu Item pop-up:
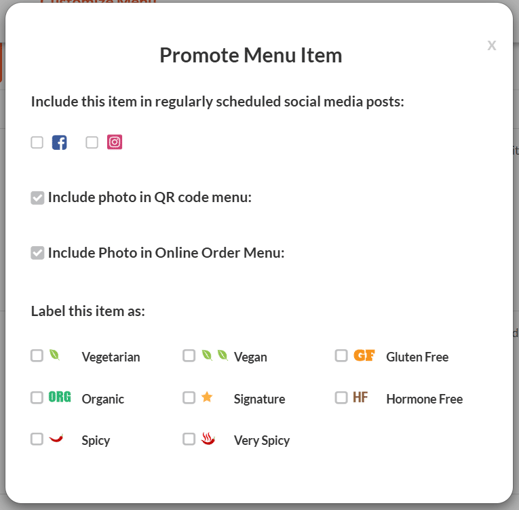
On this pop-up you will see a set of options:
-
Promote on Social Media - Checking the FB and IG boxes will add the menu item to the rotation of the automatic posts that the platofrm generates. You can find more info on creating food social media posts here.
-
Include Photo in QR Code Menu - If the menu item has a photo, checking this box will enable the photo to be displayed on the contactless QR code menu.
-
Include Photo in Online Order Menu - If you are using the SpotHopper's online ordering system, this option allows you to display/hide the photo for the given menu item on the ordering page.
-
Label This Item as - These labels help guests quickly identify dietary details or special features such as signature dishes. They appear next to the menu item on your contactless QR code menu and SpotHopper’s online ordering page only. They do not appear on the menu page on the website.
Hiding Menu Items
Need to temporarily hide certain menu items from displaying on your website?
Navigate to the "Menu" page and open the menu you’d like to edit.
Find the three red icons — Table (dine-in), Bag (pick-up), and Truck (delivery) — next to the item you want to hide, and uncheck all three boxes.
-png.png?width=670&height=70&name=annotely_image%20(78)-png.png)
Note: The hidden menu items remain saved in SpotHopper, so you can easily restore them anytime by rechecking the boxes.
Deleting Menus, Sections, and Items
Navigate to the "Menu" tab under "Menu & Content," and click on the menu pencil icon next to the menu you wish to delete.
Deleting Entire Menus
1. To delete the entire menu, click the "Configure/Set Hours" button next to the Menu details, as shown in the image below.
2. This will expand the configuration details. Hit the trash can found on the right.
-png.png?width=670&height=128&name=annotely_image%20(74)-png.png)
3. Click "Yes" to confirm you'd like to delete the entire menu.
Deleting Menu Sections
1. To delete a menu section, click the "Configure" button next to the Menu Section details, as shown in the image below.
2. This will expand the configuration details. Hit the trash can found on the right.
-png.png?width=670&height=91&name=annotely_image%20(75)-png.png)
3. A confirmation pop-up will appear. Click "Yes" to confirm.
Deleting Menu Items
1. Find the menu item you wish to delete.
2. Click the associated trash can icon.
-png.png?width=670&height=69&name=annotely_image%20(77)-png.png)
3. Click "OK" when the confirmation pop-up appears.