Contents
- Why Stripe?
- Stripe Account & Payout Limitations
- Payout Schedule Options
- Fees & Costs
Pass Processing Fees to Customers - How to Set Up Your Online Payments
Credit Card and Banking Details - Revoking Access
If you would like customers to make transactions through any of SpotHopper's services, you will need to set up a Stripe account. SpotHopper uses Stripe - a global payment processor and financial solution - to transact payments.
Why Stripe?
Trustworthy: Trusted by over 35,000 businesses worldwide — including 62% of all Fortune 500 companies — for secure, reliable payment processing.
Reliability: 99.99% uptime to keep your payments flowing, 24/7.
Flexibility: Accepts all major credit and debit cards, Apple Pay, and more in 130+ currencies.
Ease of Use: Quick setup, seamless dashboard access, and full control over payouts.
Stripe Account & Payout Limitations
Only one Stripe account can be connected to a single SpotHopper account at a time.
If you manage multiple locations, each SpotHopper account must have its own Stripe account connected.
Additionally, Stripe only allows one external bank account per currency and per account for payouts. That means that you cannot connect multiple bank accounts to a single Stripe account for separate payouts.
If you oversee several venues, you can manually transfer funds from your main bank account to other accounts after payouts are received. This can be done using your own banking or accounting tools to allocate funds as needed.
Payout Schedule Options
Stripe offers flexible payout schedule options. You can automatically receive your funds daily, weekly, or monthly — or create a custom payout schedule that works best for your business.
Transferring funds from your Stripe account is quick and easy right from your dashboard:
-
Log in to your Stripe Account and navigate to Transfers.
-
Open your Settings tab.
-
From there, you can:
-
Connect your bank account
-
Set up an automatic payout schedule
-
Manually transfer funds to your bank account
-
Your first payout may take 7–10 business days to process. After that, your chosen payout schedule applies.
Your Stripe account must be linked to the bank account that handles your business finances.
Fees & Costs
SpotHopper does not charge any additional fees beyond Stripe’s standard processing rate of 2.9% + 30¢ per successful charge (for businesses under $1 million in annual volume).
SpotHopper only charges a $1 fee per each takeout order or event ticket. If you’re using Event Planner, this $1 fee is waived for event tickets.
Pass the Processing Fee to The Customer
You can do this by:
-
Going to Settings → Payment Services in Stripe and selecting Charge my customer a processing fee, or
-
In SpotHopper, navigating to checking the box Pass Credit Card Processing Cost to Customers under the Online Order or Event Tickets settings.
How to Set Up Your Online Payments
1. Navigate to the "Banking/Online Payments" tab under the "Settings" section - this is where you can access Stripe for your SpotHopper account.

2. The page will show the following:
3. After you click "Connect with Stripe," you will be taken to the page where you can either connect your spot with an existing Stripe account or you can fill in the necessary information and create a new account.

To create an account the 3 main things you will need are:
- Last 4 of your Social Security Number
- EIN (Employee Identification Number)
- Banking Account Number and Routing Number

If you click to 'Learn more' you will be taken to the StripeDOCS that explains the procedure more thoroughly - activating Stripe, updating your information, and keeping your account safe.
You can create your Stripe account on the spot. The process is easy and self-explanatory throughout. You are required to enter all the Business details (address, phone, type of business, etc.) correctly.
An individual or sole proprietor must activate their own Stripe account. If you’re completing this form on behalf of someone else, please invite them to become an administrator and complete this form.
Credit Card and Banking Details
Securely connect your bank account with Stripe.
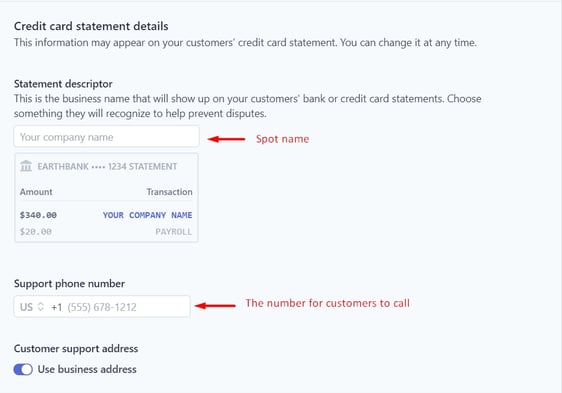
The "Your company name" that you enter is the one that the transaction statement will show. Ideally, it should be the name of your Spot.
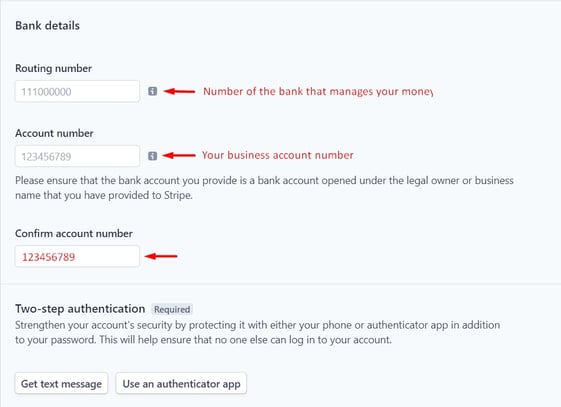
1. Two-step authentication is used as a security protocol when you are accessing your Stripe account.
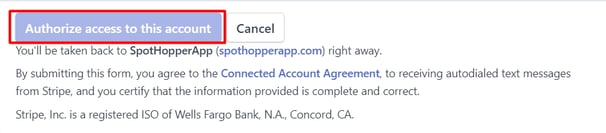
2. After you enter all the required information, you will be able to click the blue button to 'Authorize access to this account'.
3. After you authorize the access to the account, you will receive an email asking for verification, so Stripe can verify that it is really you making the account.
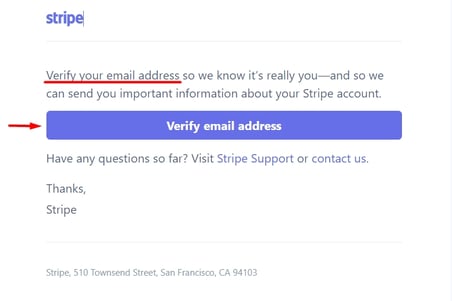
4. Once you click "Verify email address," you will be ready to start processing your online payments!

If you have successfully created a Stripe account, but because of a bug it did not connect to SpotHopper, simply log in to Stripe on the "Banking/Online Payments" page, and it should connect.
Revoking Access
You can revoke SpotHopper of its access to Stripe at any time from the Settings > Authorized applications area of your Dashboard in Stripe itself.
Note: Stripe will show all the connected applications with their access type and the date of approval. Clicking 'Revoke access' will remove the application from the list and effectively disconnect it from SpotHopper.