Contents:
-
Creating and Sending Proposals
Creating New Proposal/Payment Requests
Reviewing and Editing Proposals
Sending Proposals/Payment Requests
Overview: Proposals & Payments
Proposals & Payments are available only with the Event Planner upgrade. Learn more about Event Planner and how to activate it here.
The Proposals & Payments feature lets you send secure payment requests directly through SpotHopper. Whether you’re collecting a deposit to hold an event date, charging a cancellation fee, or requesting partial/full payment, everything is managed right from the inquiry.
This system replaces guesswork and back-and-forth messaging with professional, trackable proposals your guests can view and pay online.
⚠️ Note: To send proposals or collect payments, you need to have your Stripe account connected to SpotHopper. You can find instructions on how to connect Stripe here.
Setting Up Default Payment Options
Before creating your first proposal, make sure your default payment settings are configured in Event Planner. This ensures your payment types, default amounts, and attachments are ready to use each time you send a proposal.
To start, navigate to the Settings tab on either the "Private/Group Inquiries" or "Catering Inquiries page," then scroll down to the Event Planner section.

Here you will find "Payment & Proposals," where you can:
-
Set default values for Deposits, Cancellation Fees, Installments, or Full Payments.
- Choose the payment type(s) you'd like to be available to use when creating payment proposals.
-
Upload a Default Proposal Attachment (e.g., your standard payment agreement or terms) that you can send along with your proposals.

These are only default amounts that will automatically show when creating the proposal. You can edit the amount and customize the proposals you'd like to send, directly from the inquiry details page.
Creating and Sending Proposals
You can create and send proposals directly from the inquiry's details page — whether it’s for a deposit, a cancellation fee, or a partial/full payment.
NOTE: The instructions in this article are for the new and improved inquiry details page:

If your page doesn't look like this and you still have the old layout, you can upgrade to the enhanced page for free by clicking the "Switch to New Layout" button.

You can find the instructions for proposals/payment for the old page here.
Create New Proposal/Payment Request:
To start, open the specific inquiry and navigate to the "Payment" tab from the right sidebar.
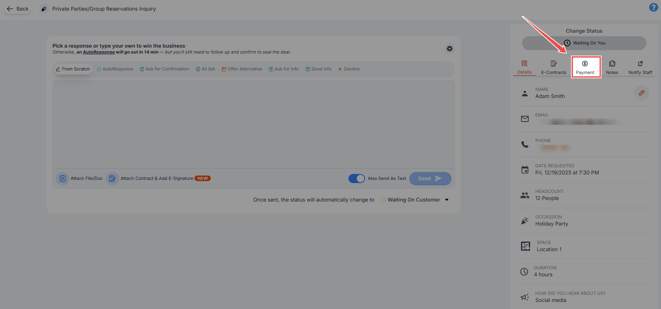
Click the red "Create New Proposal/Payment Request" button. 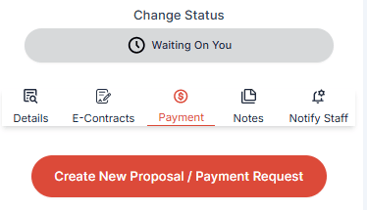
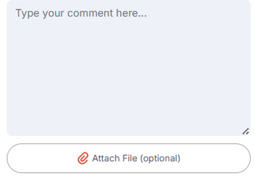
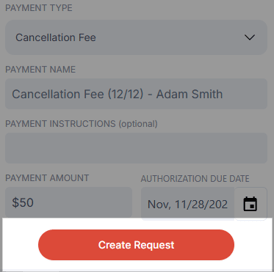
The Proposal Details pop-up will appear.
Here you can:
- Type a comment and attach a file (optional) that will be shown on the Payment Details page.
- Choose the payment type. You can choose the payment type you wish to request (deposit, cancellation, partial, or full payment).
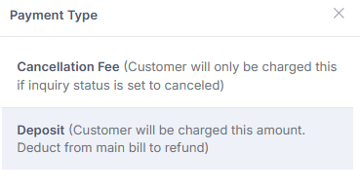
The payment types available in this drop-down come from the defaults you’ve set under Event Planner Settings. If you don’t see the desired option, revisit your settings to update your payment types. - Add a Payment Name. This field is automatically filled but you can customize it if needed. The payment name appears on the Payment Details page visible to your customer.

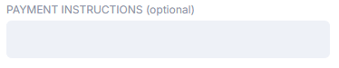
- Include Payment Instructions (optional). These will appear under the Payment Info section, where your customer will be prompted to enter their payment details.
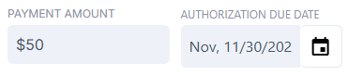
- Add the Payment Amount and Due Date. The amount field will display your default value from the Event Planner Settings, but you can adjust it as needed. You can also choose an Authorization Due Date — after this date, the payment option will expire, and your customer will no longer be able to complete the payment to secure their booking.
- When done, hit the red "Create Proposal" button found at the bottom of the Payment field.
Reviewing and Editing Proposals
Creating a new payment proposal doesn’t automatically send it to your customer — it simply saves the request so you can review and edit further if needed, before actually sending it.
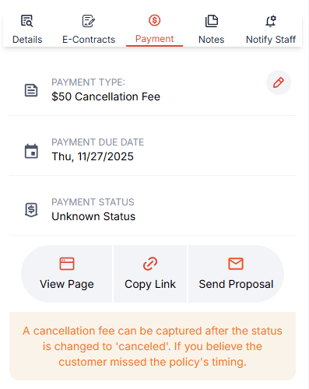
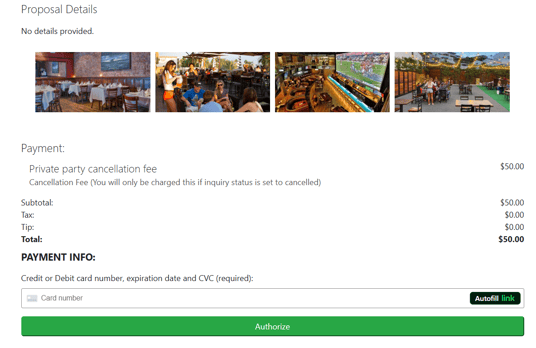
Once your proposal has been created, you can see how the Payment details page will look to your customers. Just click the View Page button and it will open the page that your customers will receive via email, where they can add provide their payment details.
If you want to edit the proposal, just click the pencil icon next to the payment type:

Then you can edit the payment type and amount, due date, add a comment or attach files if needed.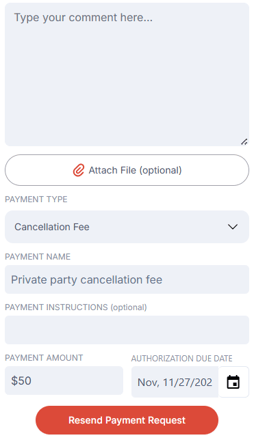
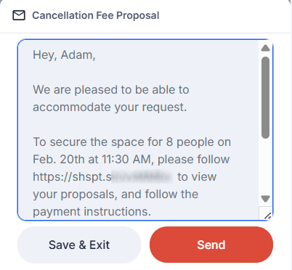
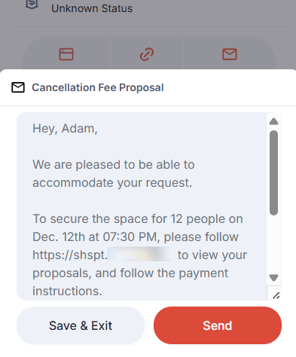
When done, click the "Resend Payment Request" button. A confirmation pop-up wil appear, with the default message that will be emailed to the customer.
If you want to resend the payment request, customize the message if needed, then click the "Send" button.
If you don’t want to send email notifications, click "Save & Exit" instead. This updates the Payment Details page only, where the customer will see the revised information.
⚠️ The payment link is included in the message by default. If updating the text, ensure the link is not removed or altered so the guest can access the proposal and complete the payment.
Sending Payment Proposals
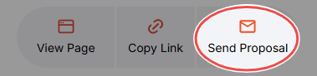
Once your proposal has been created, you can easily send it to your customer by clicking the "Send Proposal" button.
A pop-up will appear in the lower right corner, with the preview of the message that will be sent to your customer.
Edit the message if you'd like to, then click the "Send" button.
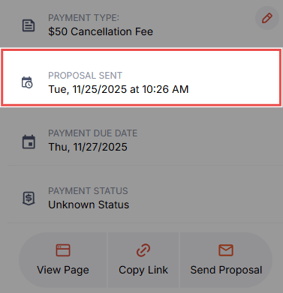
Once your payment proposal has been sent, you will have a Proposal Sent field under the Payment tab, to reflect that.
Charging and Refunding Payments
The way payments are charged and processed depends on the payment type selected in your proposal — whether it’s a deposit, partial/full payment, or a cancellation fee. They follow a slightly different workflow, giving you flexibility over when and how your customers are charged.
Deposits and Partial/Full Payments
For Deposits and Partial/Full Payments, your customers are charged immediately once they enter their payment details and authorize the transaction.
These payment types are ideal for confirming bookings or collecting advance payments before services are rendered.
💡Best Practice: Use deposits for bookings scheduled more than a week in advance and partial/full payments to secure larger catering orders.
How Does It Work?
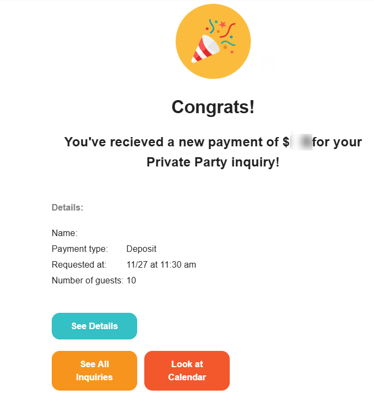
Once your customer has provided their payment information and paid the requested amount, you will receive an email notification.
This will also update the payment status under the Payment tab:
To refund the deposit, simply click the "Refund" button found next to the Payment Status:

A confirmation pop-up will appear. Click "Issue Refund" to confirm.
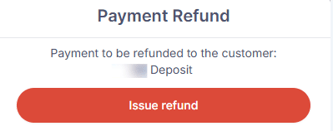
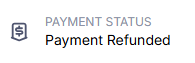
The funds will be returned to your customers, and the payment status will reflect that:
Cancellation Fees
For Cancellation Fees, customers are not charged automatically when they submit their payment information. Instead, they simply authorize the payment by providing their card details, allowing you to manually capture the charge later if necessary.
💡Best practice: Use cancellation fees for event bookings happening within a few days, as these payments are meant to be captured closer to the event date.
How Does It Work?
Once your customer provides their payment information, you’ll receive a notification email confirming that their payment details have been authorized.
This will also update the payment status under the Payment tab to Setup Intent Authorized.
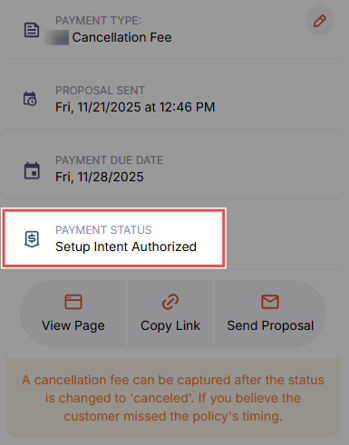
To charge a cancellation fee, first change the inquiry status to "Cancelled."
Note that changing the inquiry status alone doesn’t process the charge. To capture the funds, click the "Capture" button next to the payment status — this will immediately charge the customer.

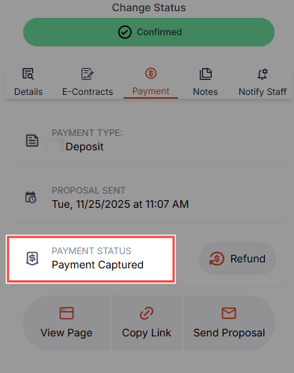
Once captured, the payment status will update to "Payment Captured," and you’ll see a Refund option available in case you need to return the cancellation fee.
