Contents
- Enabling the Online Ordering Page
- Payment Configuration
- Order Scheduling and Turnaround Times
- Setting Inquiry Notifications
- Customizing the Ordering Page
- Testing Online Orders
- Managing Online Orders
WATCH: How to Manage Inquiry in SpotHopper
Enabling the Online Ordering Page
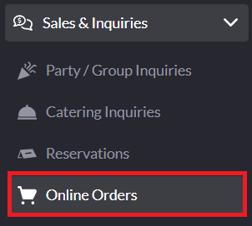
1) To begin, navigate to the "Online Orders" tab under "Sales & Inquiries."
2) Click the "Settings" tab at the top of the screen.

3) To use SpotHopper for Online Ordering, check the "Active" box.

4) Next, choose whether you’d like to offer Pickup, Delivery, or both, depending on your restaurant’s services.
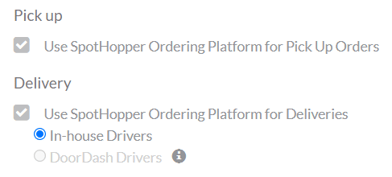
If you choose to enable Delivery orders, you can either use your own In-House Drivers or enable the DoorDash integration to leverage DoorDash’s driver network.
Keep in mind that enabling DoorDash deliveries only allows you to use their drivers — it does not list your restaurant on the DoorDash app.
⚠️ If you already have a third-party online ordering system on your website, enabling SpotHopper’s Online Ordering will likely overwrite and replace your existing ordering page.
If you’d like to use SpotHopper’s ordering system alongside your current third-party service, please reach out to your SpotHopper Support Representative for assistance with setup.
Collapse All Menus on the Page
Below the Delivery section, you’ll see an option labeled "Collapse All Menus on the Page."![]()
When this setting is checked, all menu sections on your online ordering page will be collapsed by default. This allows customers to expand only the sections they want to view, making large menus easier to browse.
If the box is unchecked, all menu sections will remain expanded by default, creating a full, scrollable view similar to the example below:
Payment Configuration
Below the DoorDash field, you will find the Payment Configuration settings.
Payment Method

In the Payment Method section, you can choose how you’d like to collect payments from your customers:
-
Take Credit Card Payments Online – Customers pay through SpotHopper’s Online Ordering system at checkout.
-
To use this option, your Stripe account must be activated and connected, so you can accept online payments.
-
If Stripe isn’t connected yet, you’ll see an orange prompt to “Activate Banking/Online Payments to Enable” that will open the Banking/Online Payments page where you can connect.
-
-
Collect Payment on Pickup/Delivery – Customers pay when they pick up their order or upon delivery.
Delivery Fee and Tax Rate
-
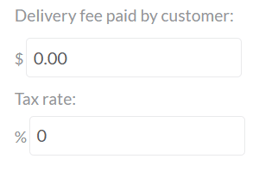
Delivery Fee Paid by Customer – Enter the flat delivery fee you want to apply per order. You can add the delivery fee only for in-house drivers.
 For DoorDash deliveries, the fee is pre-set and cannot be changed.
 - Tax Rate – Enter the tax rate that applies to your restaurant's location.
Payment Provider Configuration

SpotHopper gives you advanced settings to help manage payment security and processing:
-
Use a stricter credit card authorization algorithm – Enables additional verification steps to reduce the risk of disputed or unauthorized (e.g., stolen) credit card orders.
-
Pass credit card processing cost to customers – Adds credit card processing fees to the customer’s total.
⚠️ Stripe applies a credit card processing fee (2.9% + 30¢ per successful card charge) that you can pass to your customers.
In some jurisdictions, passing credit card fees to customers is restricted or prohibited. Make sure you comply with local regulations before enabling this setting.
Order Scheduling and Turnaround Times
This section controls how early your customers can place orders in relation to your operating hours and prep times.
Order Scheduling
On your Online Ordering page, your customers will have an option to "Schedule for later." This is where you can set how close to opening and closing time they can place a pick up or delivery order.

Turnaround Time Configuration
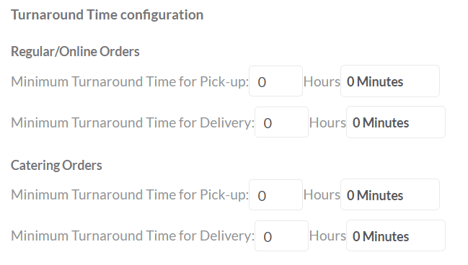
-
Regular/Online Orders – Set the minimum prep time before an order can be ready for pickup or delivery.
-
Catering Orders - If you’re using SpotHopper’s Catering system and want to allow customers to place catering orders online directly from the Catering page, this is where you’ll set the turnaround time for large orders.
The time here should include a longer prep window—most restaurants set a minimum of 24 hours for catering and other large or custom orders.
Setting Inquiry Notifications
Below the time configuration settings, you’ll find the Notification section, where you can manage order alerts for your team.
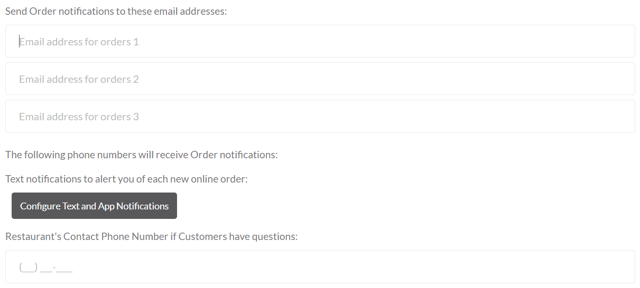
Email Notifications
Add up to three email addresses to receive notifications for new online orders.
Each address entered will receive order details automatically as soon as an order is placed.
Text and App Notifications
You can also receive text or in-app notifications for each new online order. To enable these alerts, click "Configure Text and App Notifications." More on these notifications here.
Restaurant Contact Number
Add your restaurant’s contact phone number in the designated field. This is the number customers can call if they have questions about their online order. The customer will see this number on the Order details page, as well as in the confirmation email they will receive upon placing the order.
Customizing the Ordering Page

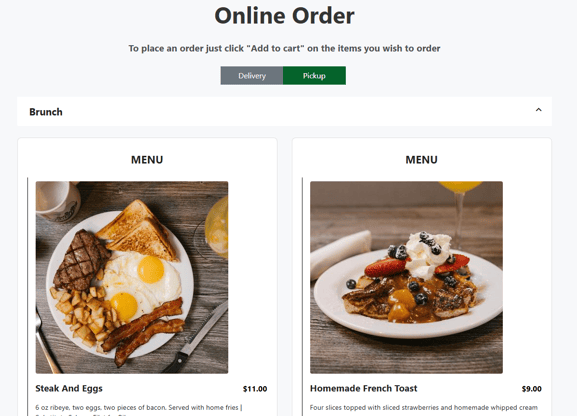
Use the Order Instructions field to provide additional information or guidance for your customers. This text appears at the top of your online ordering page and can be used to:
-
Add a short welcome message.
-
Provide special ordering instructions (e.g., "Please call us for same-day catering orders").
-
Explain how to place an order ("Click ‘Add to Cart’ for the items you wish to order").
Below this description, you will see the field for text marketing opt-in.

Checking this option adds a text marketing box where customers can consent to receive SMS updates. Customers who opt in will be added to your SpotHopper texting list, and if you are using SpotHopper’s texting feature, you can send them announcements, promotions, and other updates.
Testing Online Orders
Once you're done with setting up the Online Order page, you can go ahead and test how the online ordering system works.
At the bottom of the Settings page, click the gray "Test Enviroment (Fake Orders)" button.
-png.png?width=595&height=131&name=annotely_image%20(84)-png.png)
This will open your online ordering page—even if it hasn’t been activated yet—so you can place test orders, experience the checkout process as a customer, and see how those orders appear and flow through the SpotHopper platform.
Managing Online Orders
You can manage all online orders directly from the Online Orders page under Sales & Inquiries, where you can view order details, update statuses, and handle payments as needed.
To learn more on managing and responding to any inquiry in SpotHopper, check out our step-by-step guide on Managing Inquiries.
WATCH: How to Manage Inquiries in SpotHopper
For more details on managing order payments, visit our Managing Online Order Payments.
Tip: Always follow up with your customers and their orders, ideally through the SpotHopper platform, to ensure everything goes smoothly.
Important: If you’ve received a payment online (not upon pickup or delivery), you have 7 days to update the order status to “Accepted.”
This status update triggers the payment transfer to your Stripe account, so it’s essential to manage your orders in SpotHopper promptly to ensure your funds are transferred on time.
To see what online ordering and the shopping cart look like for your customers check out our "How Your Customers Place Online Orders" article.